This chapter contains the following topic:
Use this selection to print picking tickets. A picking ticket is a list of items from an order or invoice, printed in order by item location code (bin or shelf location in the warehouse or stockroom). The ticket is used for gathering (picking) the items to be shipped.
The picking ticket data may also be exported to a file.
For the CSV export double quotes (") are used as a field delimiter. Do not use a double quote in any of the data being exported. It will cause the data to be exported to an incorrect field.
PBS Version 12.06 Layout Changes and Picking Ticket Exports
Starting with PBS version 12.06 the customer and ship-to name, address 1, address 2, city, state, zip and apply-to invoice fields were expanded when using either the CSV or TXT export. New fields were added including address 3, address 4 and county. You will need to take these changes into account when interfacing to your external system.
Select Picking tickets from the O/E menu.
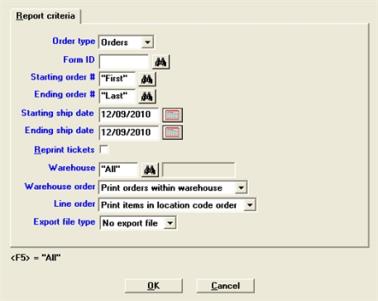
Graphical Mode
Character Mode
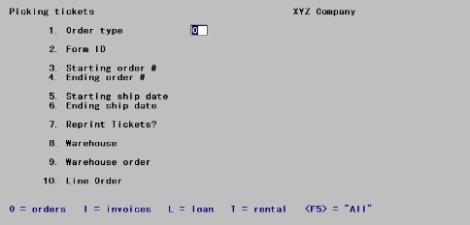
Enter the following information:
Select the type of order for which to print picking tickets. The choices are:
| Graphical | Character | Description |
|---|---|---|
| Orders |
O |
By Order |
| Invoices |
I |
By Invoice |
| Loan |
L |
By Loan |
| Rental |
T |
By Rental |
| "All" | N/A | For printing picking tickets for "All" the above types of Orders, Invoices, Loans and Rental |
Options
You have the following option in both Graphical and Character modes:
|
<F5> |
Print picking tickets for "All" the form types of Orders, Invoices, Loans and Rental. |
|
Format |
One letter from the drop down list. The default is Orders. |
|
Example |
Select <Enter> |
Enter the Form ID for which to print picking tickets.
Options
You may can one of the options:
|
<F1> |
For next Form ID |
|
<SF1> |
For previous Form ID |
|
Format |
Up to five characters |
|
Example |
Press <F1> |
Starting order #
Ending order #
Enter the range of orders for which picking tickets are to be printed. Press <F2> for "First" and "Last"
|
Format |
Up to six digits |
|
Example |
Press <F2> at both Starting and Ending order # fields |
Starting ship date
Ending ship date
Enter the range of shipping dates.
The next two fields may only be entered if you are using multi-warehousing. In character mode, if you are not using multi-warehousing, the remaining screen fields are renumbered.
|
<F1> |
For "ASAP" at the first field. Second field is skipped |
|
<F2> |
For "Earliest" and "Latest" at both fields |
|
Format |
MMDDYY |
|
Example |
Press <F2> at both Starting and Ending ship date fields |
If you wish to reprint picking tickets (that have already been printed), check this box.
|
Format |
Check box, where checked is yes and unchecked is no |
|
Example |
Leave the box unchecked for no |
This field, and the next, can only be entered if you are using multi-warehousing.
Enter a warehouse code to print picking tickets for a specific warehouse.
You may use the options:
|
<F5> |
To print picking tickets for "All" warehouses |
|
<Enter> |
For Central warehouse |
|
Format |
Up to two characters |
|
Example |
Press <F5> to select "All" |
If serial numbers were entered for a serialized line item, they appear on the picking ticket under the line item. A blank space is also provided for writing each serial number that was not specified at the time the order was entered.
Similarly, if lot numbers were entered for a lot-controlled line item, they print under the line item along with their respective allocated quantities. Blank spaces are provided for writing additional lot numbers and quantities if the quantity to be shipped has not been fully allocated.
Enter the order in which you wish to print.
If you entered a specific warehouse for the previous field or you are not using multiple warehouses, entry for this field is not allowed.
Options
You may use one of the options:
| Graphical | Character | Description |
|---|---|---|
| Print orders within warehouse |
O |
To print orders within warehouse |
| Print warehouses within orders |
W |
To print warehouses within orders |
|
Format |
Drop down list with the two choices above |
|
Example |
Select Print orders within warehouse |
Enter the code in which you wish to print items.
Options
You may use one of the options:
| Graphical | Character | Description |
|---|---|---|
| Print items in location code order |
L |
To print items in location order |
| Print items in sequence # order |
S |
To print items in sequence # order |
|
Format |
Drop down list with the two choices above |
|
Example |
Select Print items in location code order |
This field can only be entered if you opted to include it by checking the Activate and use picking ticket export field in O/E Control information.
Enter the code to determine which text file type will export. The file name that gets created is either DIOPIKxx.CSV (CSV file format) or DIOPIKxx.TXT (fixed length format) where xx indicates the PBS company. This file is overwritten each time you run the export.
The export file will contain a header line for each order and additional lines for each line item.
If you upgraded your data from a version before v12.06 see PBS Version 12.06 Layout Changes and Picking Ticket Exports.
Options
You may use one of the options:
| Graphical | Character | Description |
|---|---|---|
| .TXT file |
T |
To create a fixed length text file |
| .CSV file |
C |
To create a CSV (comma separated value) file |
| No export file |
N |
No file will be created |
|
Format |
Drop down list with the choices above |
|
Example |
Select No export file |
Regardless of what you select here, a picking ticket printer must also be selected.
Make any changes or select the OK button to select a printer for printing the picking tickets or select Cancel to return to the menu.
If using the PDF Forms Designer technology select Windows printer. You can optionally select -PDF- or -PDFP-. All three printer types produce a PDF file. Windows printer and -PDFP- also print the form and data.